I promised to finish the paper cone wreath tutorial….and you thought I forgot!
I have been working all day on the upcoming sale
but one of the things I needed to make was a paper cone wreath
so I took pictures along the way for you.
I did you a disservice yesterday with a raggedy quasi-tutorial so we’ll do it right today.
These wreaths take about 2 hrs (not including getting all the copies made)
so there are a LOT of pictures.
So you won’t get discouraged we’ll do the reveal up front. Here is the wreath hanging in my dining room….

All ready? First some basics…
Yesterday I explained that you need to find some sheet music
(or other decorative paper) that you will use for your cones.
Make two sided copies. You’ll need 30+ copies.
I confess, I didn’t count the cones…my bad. But I know I used at least 30 – 35.
I also said yesterday that I used the Fast Grab Tacky Glue, and I did. But, you will speed up the process if you use hot glue. I imagine if you’ve been doing this kind of thing awhile, you’ve been burned plenty….I know I have. So, if you are brave, go for the hot glue.
Let’s make some cones. I hold the paper like so…

I roll my hand and try to keep somewhat of a point at the bottom.
Then, before reaching the other edge, apply a line of hot glue…..

Here’s the burning part….keep your hand inside the cone and roll over onto the glue.
It attaches quickly and may leak onto your work surface so roll over,
wait a sec,
then lift it up and set it aside.
Make a bunch of cones……this is a good part to do the day before
so the assembling is much more fun!
So, now you have piles of cones.
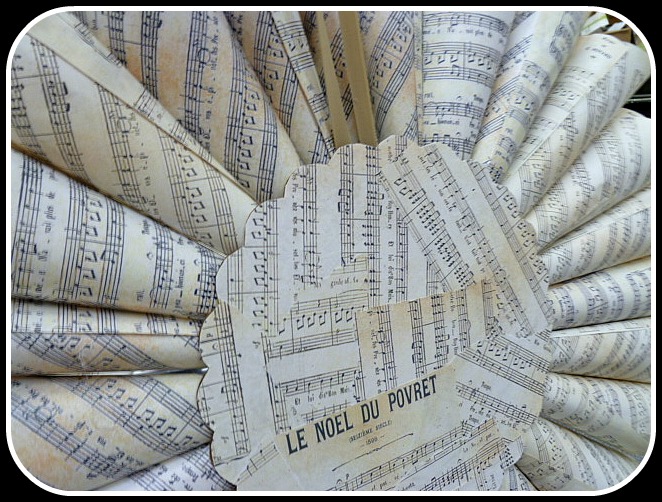
Let’s make the center medallion which will cover all those funky cone points…
We’re using the handy dandy Martha Stewart scoring board.
Take a page of your decorative paper and cut it into two pieces 4 in x 10 in.
Lay it on the scoring board crosswise so you are scoring down the 4 in length.
Score every 1/2 in.

Then fold back and forth accordian style.
Cut in half so you have two pieces that are 2 in x 10 in….

Use the Fast Grab glue and glue the ends together…
pay attention to the up-down-up-down pattern and glue them so they look continuous.
Repeat with the other strip of 4 x 10 paper.
Glue both pieces together to form a medallion….

Cut a circle of paper or cardstock which you will glue to one side of the medallion
so it will stay closed tightly.

I use a nice big glob of the Fast Grab so it will get all those accordian folds nicely.

Next make the glittered circle for the center of the medallion.
This is what I used.
This sterling glitter is VERY sparkly.

First, cut a circle out of cardstock to cover the center of you medallion…
it can be as large or as small as you like.
Spread it with glue and glitter it.
Set that aside to dry.

I decided to add a burlap fringe around my medallion.
You can also do a ruffle with paper or ribbon.
I’ll show you how to do the burlap one here.
If you sew at all, you’ll understand how to make a straight piece of fabric
go around a circle.
You do that by cutting slits all along the edge
and overlapping the little flaps as you go along.

I demonstrated on a flat piece of paper
so (hopefully) you can see what I mean.
You keep overlapping the little flaps you cut as you go around the circle.
You need hot glue for this one…
more burning…sorry!
Here is what mine looks like from the back…

My glitter circle is dry so I attached it with hot glue..

Next, I need to finish the back of my mounting board….
remember the scalloped cake circle ffrom yesterday?
I forgot to tell you that they are 10 in circles.
So, I am covering the back with torn pieces from a music sheet
and I’m using rubber cement…

Rubber cement dries really quickly so as soon as it’s dry enough, trim off the excess so the pretty scallops show….

OK, I think we have all our components ready so let’s assemble!
Remember to start with two cones opposite each other,
then add two more like four points of a compass.
That way all your cones will fall into a nice circle.
I drew a new circle with a red marker so you could see it better!


All right…now start adding in cones securing them with hot glue…

OK, halfway is a good time to add your hanger…
I’m using velvet ribbon but as I said yesterday, you can use
seam binding,
satin or grosgrain ribbon,
burlap
linen
or twill tape…..just about anything you like.

Just hot glue it in place.
Make it pretty long so you can hang your wreath easily without bending the cones.
Now finish the first layer of cones…

This is a good time (for me anyway)
to hang the wreath up somewhere
so I can step back and get a look at it.
Sometimes it helps me creatively to step back a moment
and see how it is shaping up.
I can see better all the places where I want to add my second layer of cones.
For the second layer, you want the cones to be a bit shorter than the first layer
so snip off the point of the cone.
You want to keep your center circle area open
because later you need to mount a support for that medallion you made.
Here is when your artistic eye needs to work a bit.
Add the cones and alter the way you place them
so the cones go every which way.

Once you have added all the cones you want
you can take care of the center support for the medallion.
Now, I made a cardstock ring with a circle on top of it, like a hat.
But, you could use
the top off a spray can (if it fits)
a couple wine corks,
or anything else you can find that fits the space
and is tall enough to let the medallion lie flat
so it covers the place where all those cones meet.
Here is what I did…

Make a strip of cardstock or bristol paper to fit the inside circle
and tall enough to let your medallion lie flat when it is placed on top.
The best way is to just lay the wreath down and experiment.
Once you have the size, hot glue it in place.
Cut a circle to lay on the top, like a lid.

Hot glue it in place and then hot glue the medallion on top.
Oh my gosh….you’re done!! Now pat yourself on the back! Here is what the back looks like..
Nice and neat and attractive!
I sell these wreaths so that’s important to me.
But you can leave it plain if you want to.
Once again…the finished wreath…
Linking to
French Country Cottage- Feathered Nest Friday


 I'm Lorraine. I have a love for home & design and I enjoy sharing that passion with others. I'm so glad you're here to join me.
email: missflibbertigibbet@gmail.com
I'm Lorraine. I have a love for home & design and I enjoy sharing that passion with others. I'm so glad you're here to join me.
email: missflibbertigibbet@gmail.com


Looks great! I made the same thing Sunday! Great minds think alike. Soooo I’m working on a rosette one currently. Great pictures and nice step by step! The finished one looks great! I love the burlap in the center!
What a fabulous job you did on the paper cone wreath. So unique. I tried to “follow” you but couldn’t find where your follwers were. I would love it if you would visit my blog and perhaps follow me. Have a wonderful day tomorrow. Hugs, Chris
Thanks to all! Hope you continue to follow me!
I love the look of these wreaths! But this one has to be my favorite! Love it!
Visiting from Debbiedoos
Beautiful wreath! I have a great big stockpile of vintage music that I snagged from a friend’s attic and have been meaning to make a few of these for Christmas. Thanks for sharing.
I’m hosting my monthly Before Blogging Throwback Thursdays party and would love it if you’d come and share something you made/did/bought sometime before blogging. Can’t wait to see what you share at the party.
Wow, I love your wreath and the tutorial. I’m going to have to try and make this. I’m your newest follower. I hope you will come check out my blog. http://sister-number-5.blogspot.com
I love your wreath and tutorial!!!!!!!!!! It is the best one I have found on the internet. I started one last night. I am a little too much of a perfectionist. I can’t handle the cones going every which a way. I guess I need to live a little on the next one and not make all the points line up. I especially love the way you make you center embellishments with the burlap, accordian paper circle and sliver glitter medallion. Thank you so much for sharing!!!!!!
Linda